Two attractive images do not define an action
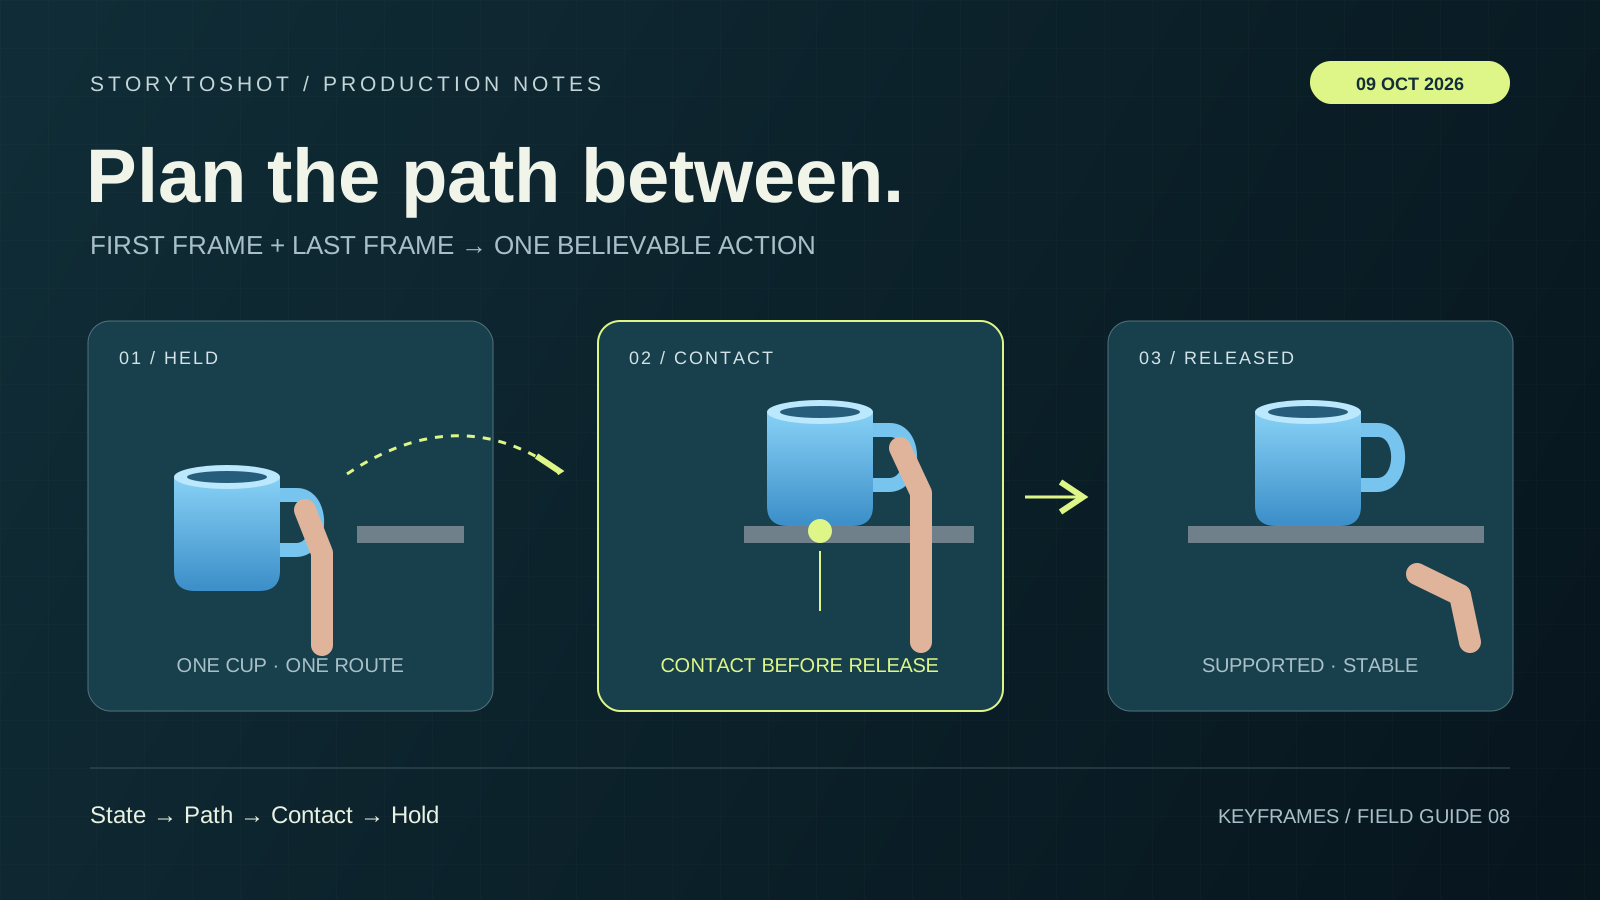
A character holds a cup in the opening image; the cup rests on a shelf in the ending image. Why does the motion pass through a hand, jump positions or introduce a second cup? The problem may begin with the endpoints: they specify two states without establishing a clear, visible route between them. This guide follows one kitchen shot in which a character moves a single blue cup from waist height to a shelf, releases it and holds the final pose. Establish how the action reaches its destination before polishing the destination. First and last frames are planning references here. Use them as generation inputs only when the actual tool explicitly supports that workflow. Accepting both images does not guarantee accurate intermediate motion. A roughly six-second edit target helps us discuss the amount of action; it is not a claim about any model’s capabilities.
Write a state change you can judge
Replace “put the cup down naturally” with observable conditions. At the start, the blue cup is in the character’s right hand, its base has no other support, and the shelf is empty. At the end, the same cup stands on the left side of the shelf, its base is supported, the right hand has left the handle, and the character remains in approximately the same place. Record invariants: one cup, no sudden handle reversal, stable shelf height and window-light direction. Distinguish the character’s right hand from screen right; one belongs to the performer, the other to the composition. Viewers should understand the transfer of support from hand to shelf, rather than see perfectly matched pixels. If the story only needs to establish that the cup has been placed, consider showing the result directly and reserve difficult motion for an event that matters.
Sketch three action landmarks before making endpoints
Add three rough drawings between the endpoints: the right hand carries the cup upward; the base reaches and contacts the shelf; the fingers release after the cup settles. Arrows and simple outlines are enough to reveal a faulty route. Can the character reach the shelf? Is there room for the elbow? Would the cup have to pass through a cabinet door? If the opening places the character too far away while the ending assumes no change in stance, shorten the distance or plan an explicit step. Do not expect generation to resolve the contradiction. For this example, move the character closer and retain a single placement action. These landmarks test the sequence; they do not imply that the tool accepts three intermediate image inputs. If a landmark cannot be drawn clearly, revisit the staging before refining the final lighting.
Make both reference images share one space
Build both references from the same scene base and composition where practical, changing only the hand, cup and necessary pose. Compare them side by side or with a translucent overlay, checking the shelf edge, wall corner and shoulder line. If the ending reveals the inside of the cup from an angle absent in the opening, the camera or cup orientation may have changed; decide whether that change is intentional. Leave the entire motion route within the frame so the cup does not disappear as soon as it rises. Inspect contact in the ending image: an attractive cup floating above the shelf does not show completed placement. Resolve obvious differences in identity, clothing and background in the stills, or the generation attempt will mix motion planning with appearance repair and make failure harder to diagnose.
Write the brief as an ordered action
A reusable brief is: “Locked medium shot in the same kitchen. The character’s right hand holds the handle of the only blue cup and steadily raises it from waist height to the left side of the nearby shelf. The base contacts the shelf, the cup settles, then the hand releases the handle and withdraws. Hold briefly at the end. Keep the shelf, window light and character position stable.” Describe visible events and their order before adding surface qualities. Do not add an orbit, a turn, a cabinet-opening action and a sip; those change the shot’s job. If the tool accepts only an opening image, keep the ending as a human review reference. If it supports both endpoints, verify the selected mode’s input requirements before using them. The brief expresses intent, not a guarantee. Fix conflicting images or simplify the motion instead of stacking demands for correctness.
Leave time for contact and release
Arrange a roughly six-second still-frame draft in an editor: about one second to recognize the held cup, three seconds for movement and placement, and two seconds to register release and the stable result. These are review targets for the example, not second-by-second instructions a generator must obey. Adjust the edit to the actual movement. The essential order is shelf contact before release, followed by enough time to understand the result. A correct position appearing only in the very last frame does not pass merely because the endpoint matches. Choose among the durations actually offered by the tool, then assess usable trimming room. If a shorter route still reads poorly, extend or split the shot rather than forcing the action to lose weight and pauses to meet an arbitrary six-second target.
Make the first test answer one question
First test whether support transfers continuously, without adding complex camera motion. Save the input-image versions, action brief, generation settings and output file. At normal speed, check that the cup reads as one persistent object. Then inspect the moments before contact, during contact and after release in slow motion: does the base penetrate the shelf, do fingers remain attached to the handle, or does a duplicate replace the original cup? Record the interval and visible failure, such as “cup briefly disappears before placement,” instead of only calling it unnatural. Change one main hypothesis on the next attempt: correct endpoint contact, shorten the route or remove an extra action. The project budget determines the number of tests; this guide makes no success-rate prediction. Clear records make diagnosis more useful than undirected retries.
Know when to split the shot
If the same contact failure persists after revising the endpoints and route, compare a split-shot design: first, approach the shelf holding the cup; second, begin just before the base touches down and show placement and release; optionally, add a reaction. Give every shot clear starting and ending states. When comprehension allows, you can omit the placement and cut to the cup already resting on the shelf, but that does not count as successfully showing the full action. If viewers must see that no substitution occurred, retain the essential contact instead of hiding it with rapid cuts. Agree on a review threshold in advance, such as revisiting the design after two targeted revisions fail to resolve the same defect. That is a scope-control agreement for this project, not a universal retry standard.
Deliver the motion evidence with the endpoints
The handoff should include the shot ID, endpoint image files, state change, invariants, selected clip version, usable in and out points, and unresolved issues. State acceptance explicitly: “The only blue cup transfers from right-hand support to shelf support, releases after contact, and remains identifiable throughout.” That tells the next editor why this take was selected. When planning in StoryToShot, put the state card and action landmarks in the shot description, then validate them in the actual generation and editing tools; approving the storyboard does not approve the video. This method suits a single object, a short route and a clear outcome. Complex occlusion, exchanges between people, pouring liquids and major camera changes need additional motion studies and tests. Two endpoint images cannot handle all of that alone. Deliver a believable process of change, not simply two appealing isolated pictures.