1. Define the problem: does this still feel like the same place?
You may have stabilized a character’s face and clothes, yet the window moves in a close-up and the desk jumps to another wall in the reverse view. The useful question is whether the shots share one space, not simply whether each image looks polished. Use this fictional exercise: a person enters a study, approaches a desk and picks up a red envelope. Establish the room before deciding which part the camera sees. Success does not require identical backgrounds in every frame. It requires compatible relationships between the door, window and desk, plus a plausible route for the person. Write down those three story actions first. Circle the objects each action needs and postpone decorative details so the review stays focused on what affects the story.
2. Draw a useful floor plan before building anything elaborate
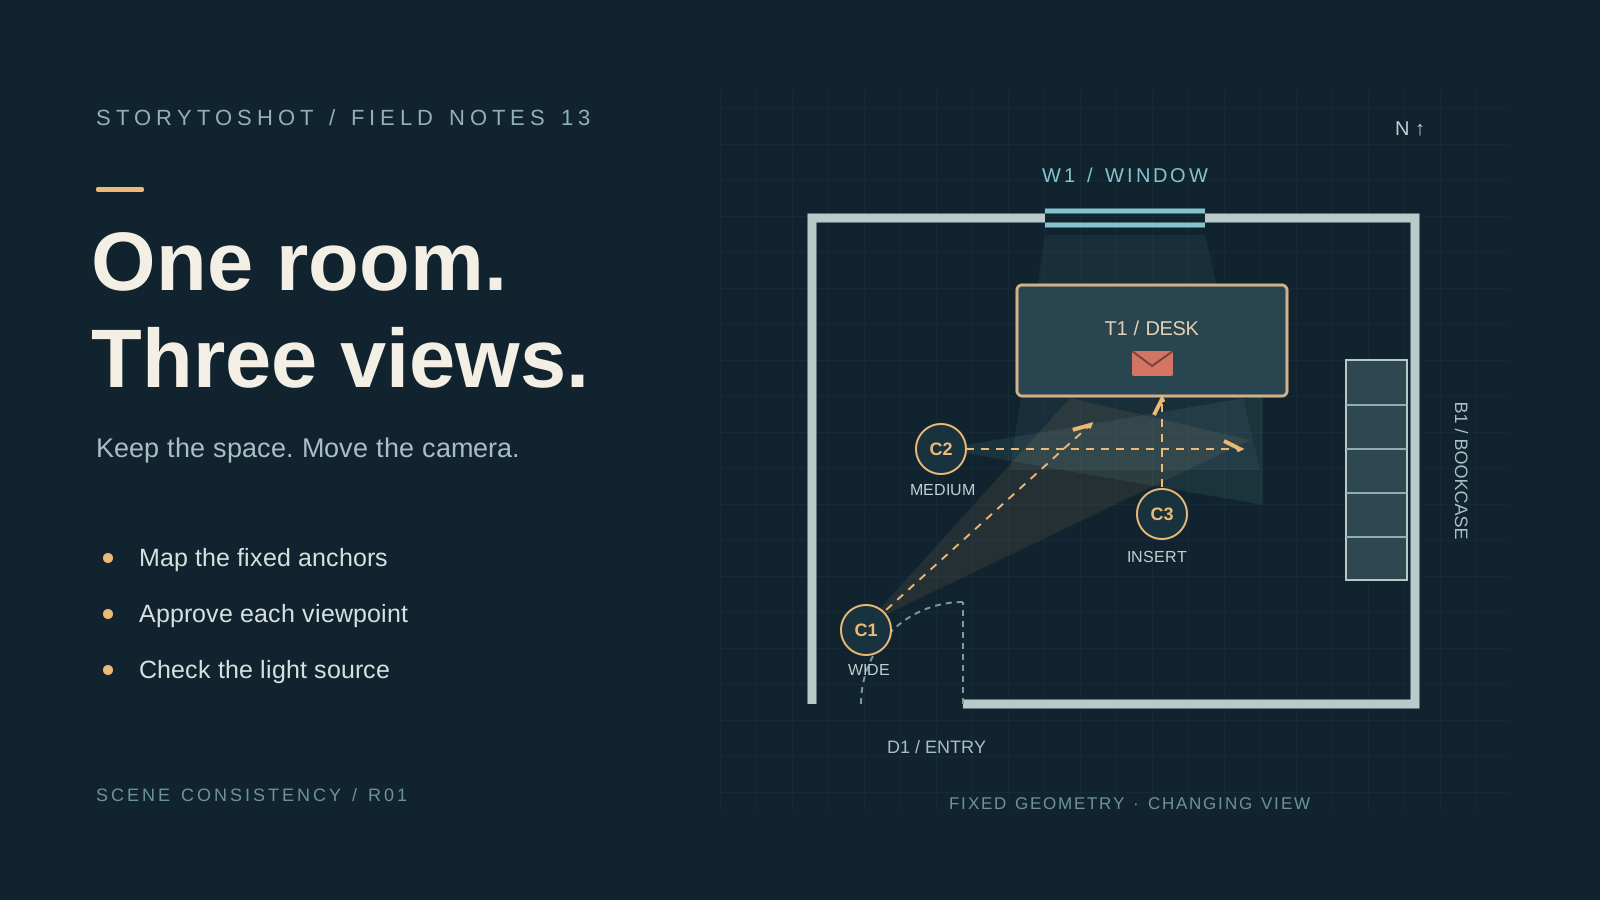
Draw a rectangle and call its upper edge the north wall. Put the entrance near the west end of the south wall, one window at the center of the north wall, a desk beneath that window and a low bookcase against the east wall. Label them D1, W1, T1 and B1, then draw the route from the entrance to the front of the desk. These directions are internal project coordinates, not a claim about geographic orientation. Note how the door opens, whether a person can stand at the desk, and which furniture sits nearer the window. Architectural precision is unnecessary, but contradictory geometry is a problem. If the action requires walking behind the desk, provide a passage on the plan first. Derive every camera view from the approved map instead of inventing a room for each generation.
3. Separate fixed layout, camera choices and temporary state
Fixed information describes the room’s structure: one north window, a wooden desk beneath it and a low east-wall bookcase. Add only a few recognition details, such as the window divisions and desk-leg shape. Camera information specifies this view’s position, direction, shot size and visible area. State information records whether the red envelope is on the desk, whether the door is open and where the person stands. Reuse a compact record: “Scene R01 | layout v1 | fixed anchors D1/W1/T1/B1 | camera C2 | visible W1/T1 | envelope centered on desk; entrance open.” Combining all three types into an undifferentiated paragraph makes it easy to change the layout while revising a shot size. Preserve the room’s identity while letting the action change its state; that distinction makes accidental drift easier to diagnose.
4. Specify what each of three camera positions can see
For shot one, place the camera near the south entrance looking north in a wide view. Establish the window, desk and east-wall bookcase while the person follows the clear route toward the desk. For shot two, move to the west side of the desk and face east for a medium view of the pickup. The bookcase can be visible; the north window may appear only at the frame edge. Do not move the window onto the east wall just to reproduce the first composition. For shot three, move close to the tabletop from the south for an envelope insert. A small, plausible patch of desk or window-frame detail is enough. Give each position two lists: must be visible, and may leave frame. An unseen bookcase is acceptable; an extra window or a person emerging from an impossible passage needs correction.
5. Prepare references for each view, not just one attractive wide shot
Approve a wide reference that explains the main spatial relationships, then prepare the medium view and insert as stills. These can come from drawings, a simple 3D blockout, a photographed model or generated images checked by a person. What matters is that all of them obey the same plan. Cropping the master image creates a tighter version of the same viewpoint; it cannot reveal the unseen reverse side. Design the opposite wall before making a reverse view instead of treating a horizontal flip as a new camera position. If your tool accepts references, check its actual input limits and the purpose of those inputs before supplying images. This workflow does not assume a particular control exists. Save approved images with their layout version so references from competing room designs do not get mixed together.
6. Anchor lighting to its source rather than the frame edge
If the window appears on the left in one composition, it need not stay on the left after a camera move. Copying “warm light from frame left” into every prompt can produce incompatible lighting on the person and desk. Anchor the instruction instead: “Daytime; the main light comes through north-wall window W1; the desk lamp is off.” Then judge which side of the face and which tabletop areas should be brighter from each camera position. You are checking whether one source explains the views, not performing a precise illumination simulation. If an insert needs fill, record its purpose and extent without casually changing the time of day. Grading can reconcile color and contrast, but it cannot explain a luminous window that has moved to another wall. Fix structural errors in the reference.
7. Approve the three stills together before adding motion
Place the wide, medium and insert together on one review sheet. Before judging the character’s appearance, check door and window counts, desk-to-bookcase relationships, walking space, key materials and the light source. Ask someone who did not generate the frames to locate the entrance and explain how the person reaches the envelope. If the explanation requires moving the desk between shots, the space is not ready. Switch between the stills in edit order and check whether the red envelope can belong to the same tabletop throughout. Only then move the approved stills into your video workflow. Review the beginning, middle and end of each resulting clip, plus newly revealed areas during camera movement. Approved stills are a starting condition; motion can still introduce openings or alter the room’s apparent depth. Make the review note actionable: “In shot two, keep the bookcase, remove the incorrect east window and preserve the action,” with the reference version attached. That is easier for the next maker to use than “the room looks wrong.”
8. Diagnose the layer of failure and choose the smallest repair
When wood grain changes slightly but the layout holds, judge its impact at the intended viewing size before regenerating. If the window-frame design changes, repair that view’s reference first. If the window moves to another wall or the desk and bookcase swap places, return to the floor plan and camera brief; another “keep consistent” instruction does not resolve the contradiction. Repair the failed shot while retaining approved views as shared evidence. Cropping may conceal an irrelevant background defect, provided the person’s position and action remain readable. Do not hide a window error by cutting off the hand that picks up the letter. If a complicated camera move repeatedly exposes undesigned areas, consider a locked view or separate shots, then check whether the revised coverage still communicates the intended story information.
9. Finish with a one-page scene pack and know its limits
Keep one page for each recurring location: scene ID, floor plan, fixed anchors, approved camera references, lighting convention and the object states that change by shot. The minimum pack here is R01 v1, four anchors, three camera positions and the envelope state “on desk → picked up.” Store it alongside the storyboard. When the room changes, identify affected shots and update their references together. This approach suits short interior sequences with a limited set of inspectable viewpoints. It does not guarantee that a generator will reconstruct an exact 3D space. Long traveling shots, mirrors, multilevel buildings or real locations that must be reproduced precisely usually need clearer geometric evidence and additional validation. Establish a believable space at low cost first, then decide which shots deserve formal production.