1. Decide what the viewer must learn before moving the camera
An AI clip may show a person merely looking up while the camera pushes in, circles and rises. The image is busy, but the story can become harder to read. A useful move directs attention, reveals information or preserves a relationship between people. Try this fictional watch-shop scene: a watchmaker works at her bench, hears the doorbell and looks up at a visitor carrying an old watch. Set one review target: “The viewer notices her reaction before learning whom she sees.” Then ask whether a locked camera can communicate that sequence. If it can, keep that version as the baseline. Add movement when changing viewing distance or exposing information has a purpose. The aim is clear expression; no camera move is inherently more sophisticated than another.
2. Separate subject action from camera movement
“She slowly approaches and the camera follows” leaves room for unnecessary changes to the person, camera and background. Start with a subject row: “Seated behind the bench, she sets down the tool and looks toward the entrance without leaving her seat.” Add a camera row: “Locked position, medium close-up, desk edge and shoulders remain visible.” To test a push-in, change only that row: “Move slowly closer along the existing viewing direction, ending on a facial close-up.” This distinguishes a person approaching from a camera approaching. Use a separate environment row to preserve the entrance, counter and lamp positions. Compare all three rows with the reference and prompt. Remove contradictory verbs, especially instructions that demand both a fixed composition and a move behind the person.
3. Compare locked, push-in and lateral versions of one performance
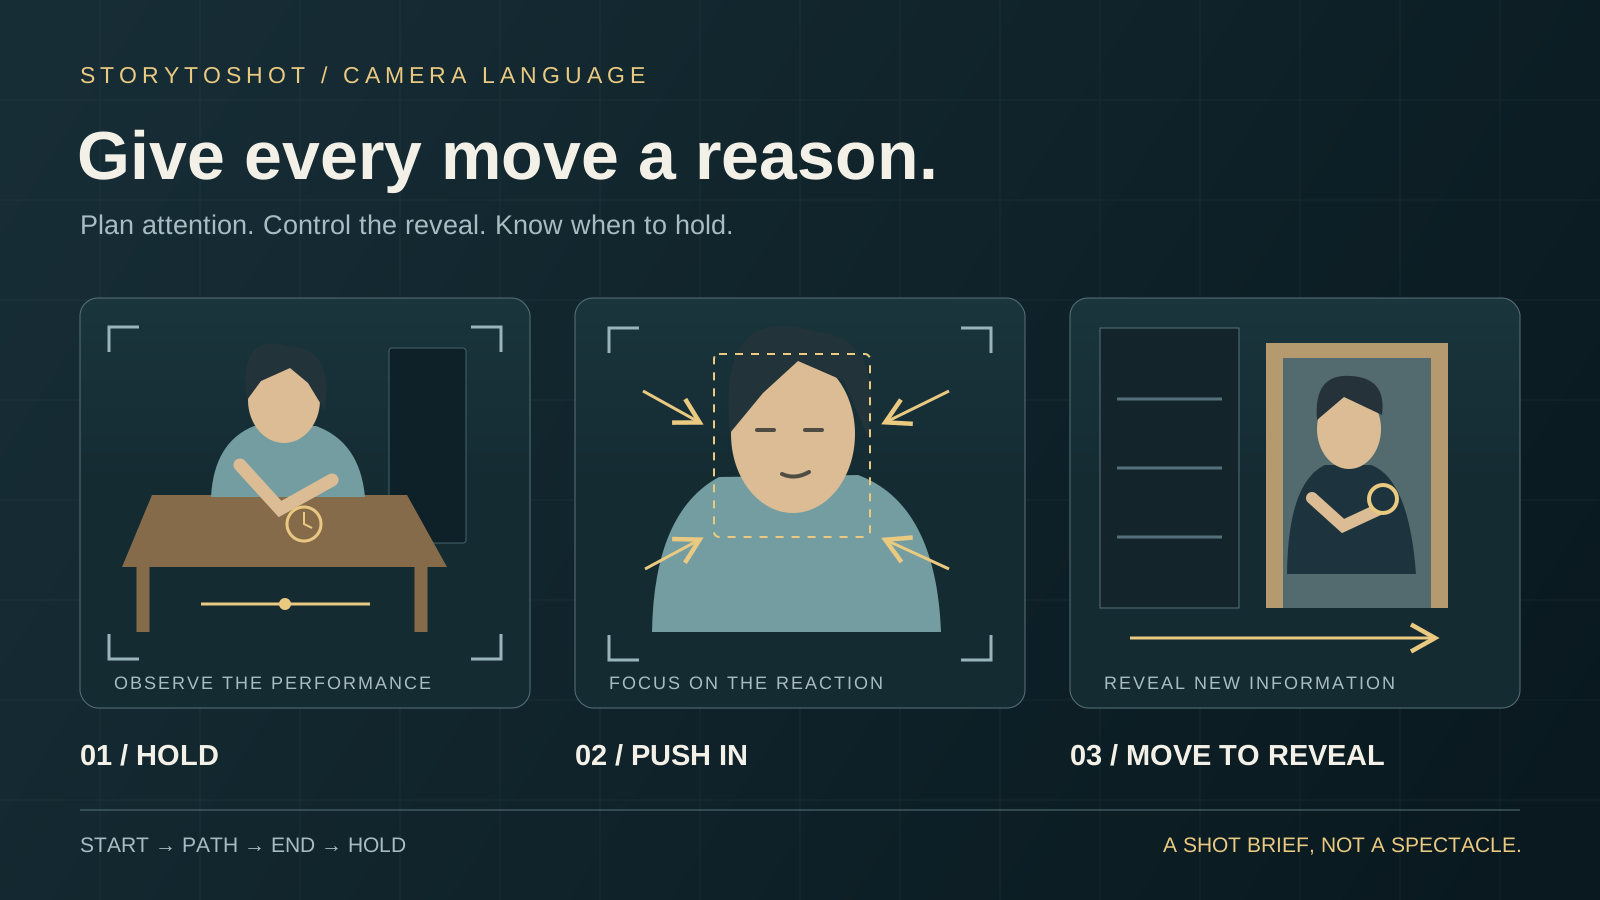
A locked version lets the viewer observe the tool being set down and the eyes lifting; it works when the performance carries the turn. A push-in narrows the view toward her eyes when the scene benefits from a closer viewing distance. Any tension still depends on performance, sound and context. A lateral move out from beside the cabinet can reveal the visitor previously hidden at the entrance; its job is to expose new information. Sketch these alternatives before deciding which to generate. If the visitor is already fully visible at the start, that lateral move loses its intended reveal. If the only goal is to show the old watch clearly, a separate insert may be easier to judge. Choose according to the shot’s task, not the complexity of its movement.
4. Specify the start, path, end and stopping condition
Use a reusable brief: “Shot S02 | purpose: read her recognition of the visitor | start: medium close-up with desk edge visible | path: move slowly closer along the existing viewing direction, without sideways travel or circling | end: close-up retaining both eyes and mouth | stop: settle after the eye movement and allow the reaction to register.” Record subject action and the next shot’s entry separately. Shot size and visible features are review criteria; “push in a little” is not enough. A path description is a production brief, not a promise that any platform offers precise track control. With text-only input, prioritize the main movement and endpoint. Where a movement control exists, use its actual options and check that the text does not contradict them.
5. Plan three phases instead of moving throughout the clip
Use a six-second shot as an illustrative plan: one second to establish the work, three seconds to move closer during the upward glance, then two seconds to hold the reaction. This is a storyboard proposal, not timing a generator is guaranteed to obey. Let an event such as the bell or eye movement motivate the start, and end in a stable state that can connect to the next shot. A camera drifting from first frame to last may leave no readable reaction hold. Try stills and a simple scale change on an editing timeline to judge rough timing before generating a changing viewpoint. If she looks up later than intended, revise the relationship between action and movement. Speeding up the entire clip also changes performance and sound timing.
6. Check what the move reveals and distinguish crop, zoom and travel
A lateral camera move should change the relationship between a nearby cabinet edge and the distant entrance plausibly. Newly uncovered areas need credible content. Moving closer can also change occlusion and perspective; enlarging a single image only tightens the framing and cannot prove a traveling viewpoint works. Optical zoom changes focal length, while camera travel changes the observation position. Keep them distinct in the brief. Scaling a still can approximate an attention shift during planning, but label it as a timing placeholder. If a slight emphasis on the expression is all you need, an editorial crop may suffice, provided the source has enough room and remains acceptably sharp. If the task is to see around the cabinet, prepare the hidden area. Cropping cannot reveal it.
7. Review a small trial against observable criteria
Use approved references and simplified action for one trial of the chosen movement, retaining the still-frame rehearsal for comparison. Before rating its cinematic feel, ask four questions: does attention reach the intended subject, does information appear in the intended order, does the subject remain readable, and is there a usable ending hold? Inspect the beginning, middle and end, plus the moment an obstruction clears. Look for stretched features, background drift or an unexplained reversal of movement. Locate the failure in time: “At second four the cabinet clears, but the entrance is empty, so the reveal fails.” Correct camera travel is insufficient if it obscures the expression. Play the neighboring shots together at the intended viewing size to check the information sequence.
8. Repair the decisive variable or replace the move with a cut
If movement is too strong but the action works, reduce travel distance or remove a movement phase. If both the person and background deform, return to a locked camera to check whether the reference and action work at all. Do not change the person, lighting and camera path together; you will lose track of what helped. If a lateral reveal repeatedly produces an incorrect background, use two locked shots: the watchmaker’s reaction, then the visitor at the entrance. This preserves the intention to show the reaction before its object. Remove a push-in that adds no information or useful emotional emphasis. After splitting the shot, review eyelines, positions and sound transitions again. Record why the change was made so the next revision does not restore a failed move merely for spectacle.
9. Store the camera decision with the storyboard and know its limits
Save the purpose, subject action, starting and ending compositions, path, trigger, hold, reference version and review decision with each shot. This example could use S01 locked to establish the work, S02 moving slowly closer for the reaction, and S03 locked to show the visitor and old watch. If the S02 trial fails, use the validated locked alternative. Keeping these decisions beside the storyboard gives generation, editing and review a shared target. The method suits short sequences with few people and inspectable paths. It does not guarantee complex long takes, fast chases or precise mechanical trajectories. Strict motion matching needs more explicit rehearsal or shooting evidence. First establish what the viewer understands at low cost, then invest in movements that contribute to the story.