1. Separate identity drift from a change in viewing conditions
A courier appears to become someone else when a wide shot cuts to a close-up. Adding “same person” does not identify what went wrong. Use this fictional sequence: Lin Lan crosses a street, stops at a doorway and reads a note. Plan a full-body wide shot, a waist-up medium shot and a facial close-up. The central method is to define a small set of observable identity anchors, then check each shot against a reference with a relevant viewing angle. First separate expected changes from drift. Turning changes the visible nose contour; backlighting changes how skin tone appears. An unexplained shift in the hairline or jaw structure deserves investigation. Faces need not match pixel for pixel across angles, and matching clothing alone does not establish identity. The target is a recognizable person across the cut, with room for expression and lighting to change.
2. Divide the character card into identity, wardrobe and story state
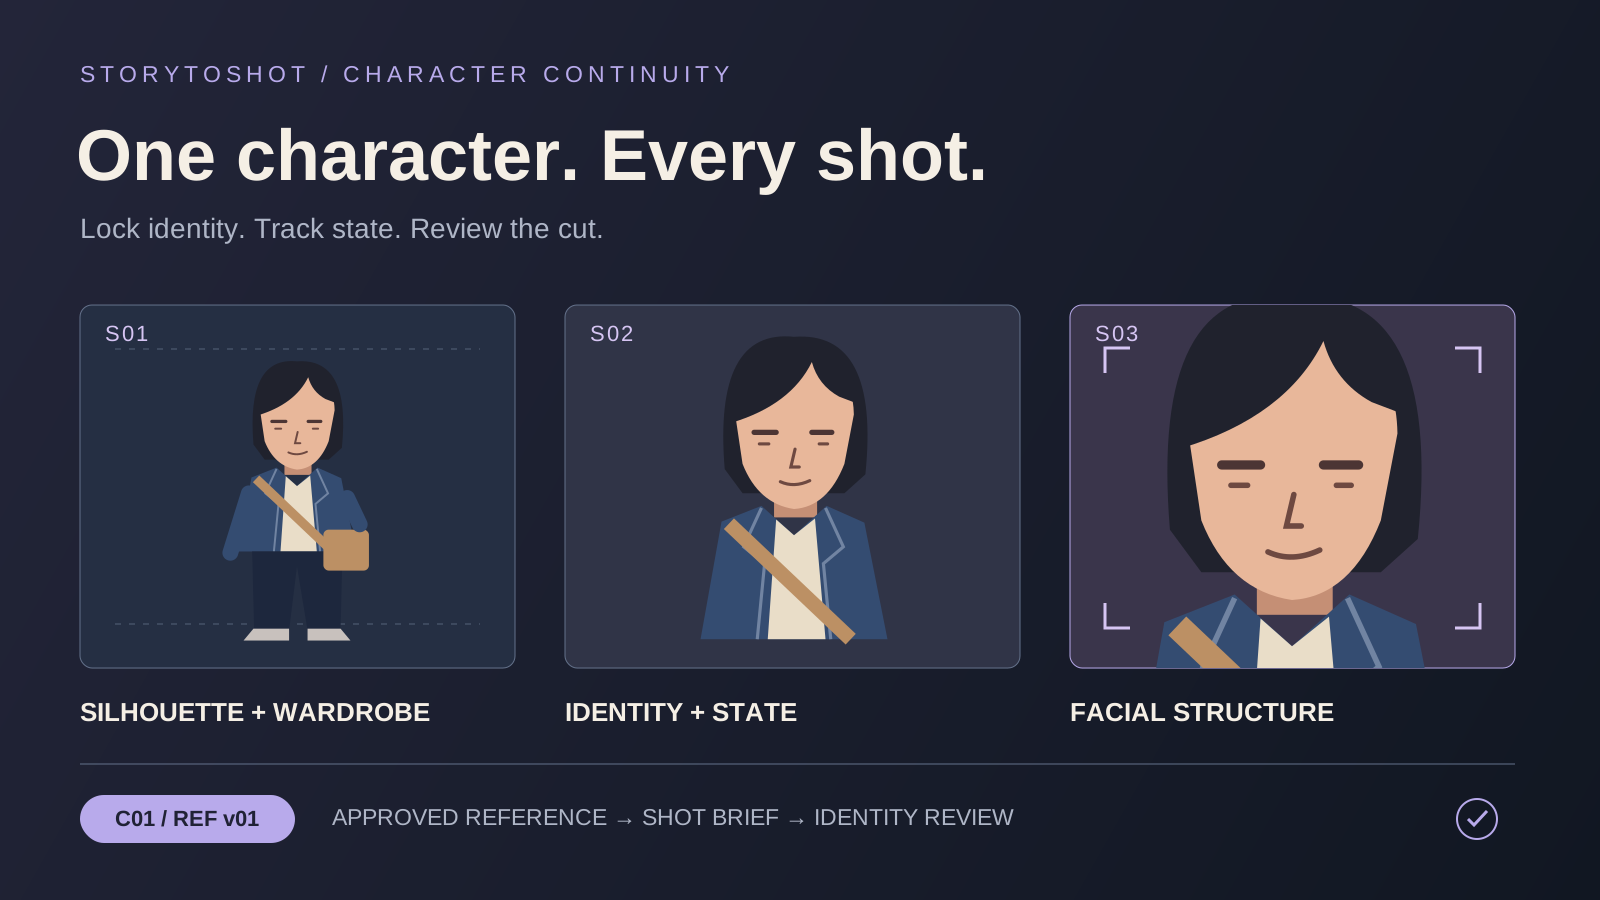
Create character card C01. The identity layer reads: “Adult woman; elongated oval face; straight brows; black jaw-length bob; part on her left.” Wardrobe reads: “Dark blue short jacket, off-white top; bag strap from her right shoulder to her left hip.” Story state reads: “Jacket open in this scene; dry hair; slightly out of breath before entering.” These are design choices for this example, not claims that a particular appearance uniquely defines a person. Prioritize silhouette, hairstyle and prominent structure rather than many tiny marks visible only in close-up. Define left and right from the character’s perspective and annotate the reference so screen position is not confused with body side. When the story requires changed clothing, rain or injury, update the relevant state and its starting shot. Preserve the underlying identity card.
3. Approve one master reference before adding necessary angles
Choose one master reference with readable identity, unobstructed features and lighting that makes inspection easy. Label it C01_REF_v01 and confirm that you have the right to use it for this production. Add a three-quarter view and a full-body view only because the planned shots need them. This sequence has no rear view, so a complete turnaround is unnecessary. Review every added image against the master; belonging to one generation batch does not make conflicting faces consistent. Remove contradictory candidates from the approved set so operators do not inherit two competing facial structures. A reference sheet can be a human communication document. When uploading, select images according to the tool’s supported count, format and intended reference role. Do not assume an annotated collage will be interpreted as instructions rather than scene content. Record whether each image establishes facial identity, side-view structure or clothing and build.
4. Assign references by shot instead of relying on one full-body image
S01, the wide shot, needs the build, bob silhouette, jacket length and strap direction to read correctly. S02 needs the facial outline in relation to the collar. S03 needs clear facial evidence. Write these needs beside the storyboard and link approved full-body or facial references with relevant orientations. A face occupying very few pixels in a wide image is a poor source for establishing close-up identity through an enlarged crop. Approve the close-up separately and reconcile it with the full-body design. If a shot turns continuously from back to front, prepare the side views encountered along the turn and test that motion first. Tools may interpret multiple references differently. The allocation sheet supports production and review; it does not guarantee that a generator will bind each reference to the intended aspect of the character.
5. Separate stable identity from the action of this shot
Use this brief: “C01 | identity source: approved facial reference v01 | stable design: jaw-length bob, dark blue jacket, strap from right shoulder to left hip | S02 state: jacket open, stopped at the door | action: lifts her eyes to read the note without turning her body | framing: waist-up, three-quarter view | review: recognizable as the same character, strap stays on the same shoulder.” If the tool has no character-ID feature, C01 is only a team index; typing it does not retrieve an identity. Extract the most relevant information for the actual prompt and use the tool’s appropriate reference input. Remove style language that unintentionally rewrites age, hairstyle or clothing. To change the mood, describe the environment and lighting, then check whether those choices hide the features needed for recognition.
6. Approve stills before adding motion
Place the three stills side by side. Does the full-body design work? Does the close-up show the same person? Can the medium shot connect them? If the stills conflict, resolve references and framing before generating video. Once approved, begin with the simplest action in S02: an upward glance and a short hold. Record the reference version, prompt and available settings. Do not change the hair, lighting and camera path in the same trial; even an improved result would leave the cause unclear. Record a fixed random seed only where the tool actually exposes one, and judge its value from the result rather than treating it as an identity guarantee. Review identity again after motion is generated. A correct first frame does not prove that the middle and end remain consistent.
7. Review identity across both shot size and time
Play the three shots together at normal speed and mark the first cut that feels like a change of person. Inspect that shot’s beginning, middle and end, plus turns and reappearances after occlusion. In wide shots prioritize build and clothing silhouette. In closer views examine hairline, facial outline, brows and relative proportions, distinguishing perspective or expression from structural drift. Use three review states: pass; a difference that does not impair recognition at the intended viewing size; identity conflict requiring repair. “The strap changes shoulders at second two” is a specific continuity fault. “The face is darker in shadow” needs a lighting explanation before rejection. For this example, a close-up resembling another person must be repaired, while tiny unreadable fabric differences in a wide shot may be accepted. Agree on these thresholds before generation, not after finding an attractive image.
8. Repair the smallest failing scope or redesign the shot
For a jacket color shift, inspect lighting and grading first. For a wrong strap direction, repair wardrobe instructions and reference alignment. For changed facial structure, revisit the approved facial reference and viewing angle. Try local editing only when the tool supports it and the affected region is controllable; afterward review neighboring areas and the full motion for new boundary artifacts. If identity repeatedly changes during a turn, replace the continuous turn with a rear-view stop followed by a frontal reaction, then recheck eyelines and action continuity. Do not replace the master reference with an accidental new face merely to rescue one failed shot: approved shots would lose their common basis. Log the problem, one change, the result and the keep-or-reject decision. At the project’s agreed attempt limit, return to the still or split-shot design instead of endlessly adding similar prompt language.
9. Keep a traceable character package and define the limits
Keep the character card, approved references, per-shot state, reference versions and review decisions together. If C01_REF_v02 only corrects the full-body strap, state that facial identity still follows v01 and list the affected shots. Another operator should be able to identify stable features and permitted state changes from this package alone. This method suits short previsualization sequences with a few characters. It cannot guarantee stable identity through crowds, heavy occlusion, extreme lighting or extended action. Similar-looking twins and characters spanning substantial age changes require more deliberate differentiation and stage-specific references. Establish recognizability in a limited sequence before expanding production. The package reduces repeated trial and error by making decisions inspectable, helping you see one person’s story at lower cost before committing to full production.